
KineMaster

How to Edit Videos on KineMaster: Beginner’s Step-by-Step Guide
Video editing can look difficult when you are new to it. However, a good mobile editor can make the process simple. You do not need advanced editing skills to create a clean and engaging video.
KineMaster provides many tools for editing videos on a mobile device. You can trim clips, add music, insert text, use effects, and adjust video settings.
This beginner’s guide explains how to edit videos step by step. By following these instructions, you can learn how KineMaster works and start creating your own videos.
Step 1: Start a New Project
The first step is to open the app and create a new project. Choose a suitable aspect ratio based on where you plan to publish the video.
KineMaster provides different project options for common video formats. You can choose a landscape format for YouTube or a vertical format for Shorts and Reels.
Choose the Right Aspect Ratio
Consider these common formats:
- 16:9 for YouTube videos
- 9:16 for Shorts and Reels
- 1:1 for square social posts
After selecting the format, open the editing workspace. KineMaster will show the timeline and editing tools you need to begin.
Step 2: Import Your Video Clips
Now you need to add your video clips to the project. Select the media option and choose videos or photos from your device.
KineMaster places your selected media on the timeline. You can then arrange the clips in the order you want.
Organize Your Clips
Before making detailed edits:
- Remove clips you do not need.
- Put clips in the correct order.
- Check the beginning and ending.
- Keep your best clips.
- Create a simple story or sequence.
Good organization makes editing easier. With KineMaster, you can move clips along the timeline and change their position whenever needed.
Step 3: Trim and Cut Your Video
Long clips often contain parts that you do not need. Trimming helps you remove unwanted sections and keep the video focused.
KineMaster lets you select clips and cut them at specific points. You can remove extra footage from the beginning, middle, or end.
How to Trim a Clip
Follow these simple steps:
- Select the video clip.
- Move the playhead to the area you want to edit.
- Use the trimming or splitting option.
- Remove unwanted sections.
- Preview the result.
Take your time when cutting clips. KineMaster makes it possible to create shorter and cleaner sequences without recording the video again.
Step 4: Add Transitions
Transitions connect one clip to another. They can make your video flow more smoothly.
KineMaster provides transition options that you can place between compatible clips. Select a transition that matches the style of your video.
Keep Transitions Simple
You can use:
- Fade transitions
- Slide effects
- Zoom transitions
- Basic movement effects
- Creative transitions
Avoid using too many different transitions. A simple style often looks more professional. Use KineMaster transitions only when they improve the flow of your video.
Step 5: Add Text and Titles
Text can help viewers understand your video. You can use it for titles, captions, names, instructions, or important information.
KineMaster allows you to add text as a separate layer. You can change the font, size, position, and appearance.
Tips for Better Text
Follow these tips:
- Use easy-to-read fonts.
- Keep text short.
- Choose a suitable size.
- Place text away from important objects.
- Keep the style consistent.
Make sure viewers can read the text quickly. With KineMaster, you can also adjust when the text appears and disappears on the timeline.
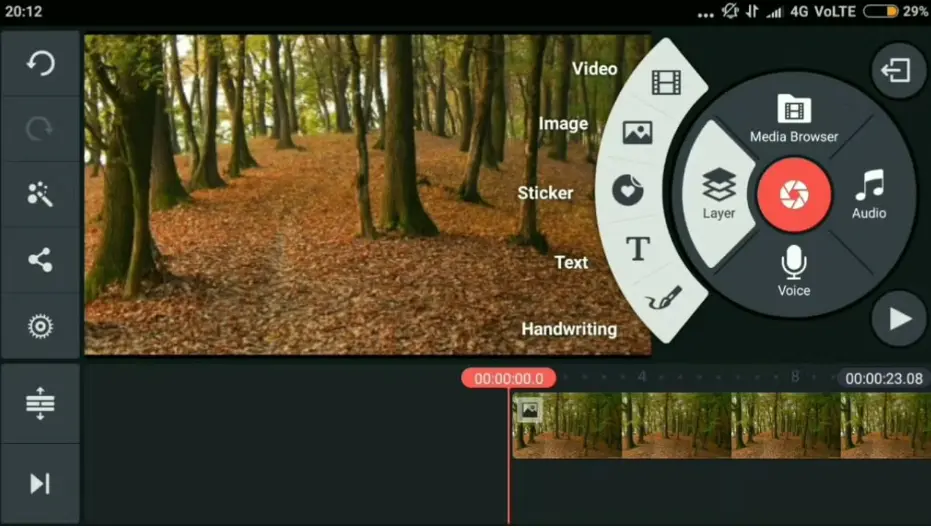
Step 6: Add Music and Sound Effects
Music can change the mood of your video. Sound effects can also make certain moments more engaging.
KineMaster lets you add audio tracks to your project. You can use background music, voice recordings, and sound effects.
Balance Your Audio
Do not make background music too loud. Your voice should remain easy to hear.
You can:
- Lower music volume.
- Trim audio tracks.
- Add sound effects.
- Record a voiceover.
- Adjust audio timing.
Good audio creates a better viewing experience. KineMaster gives you timeline controls that help you match audio with your video clips.
Step 7: Use Filters and Effects
Effects can change the appearance of your footage. Filters can also create a consistent visual style.
KineMaster includes different creative tools that you can use to adjust your clips. Select an effect and preview it before applying it.
Avoid Overusing Effects
Effects should support your content. They should not distract viewers.
Try to:
- Use effects with a clear purpose.
- Keep the style consistent.
- Avoid excessive animations.
- Preview every change.
- Use effects on important moments.
A clean video usually looks better than a video filled with random effects. KineMaster gives you enough control to create a balanced visual style.
Step 8: Adjust Video Speed
Changing video speed can create different effects. You can slow down an important moment or speed up a long section.
KineMaster provides speed controls that let you change how quickly a clip plays.
When Should You Change Speed?
Speed adjustments can work well for:
- Sports clips
- Travel videos
- Tutorials
- Funny moments
- Action scenes
- Time-saving sequences
Use slow motion when you want viewers to notice a specific moment. Use faster playback when you want to move through less important footage. KineMaster makes these adjustments directly within the editing workflow.
Step 9: Preview Your Complete Video
Before exporting, watch the complete project from beginning to end. Look for mistakes that you may have missed during editing.
KineMaster lets you preview your project inside the editing workspace. Check every clip, text element, transition, and audio track.
Final Editing Checklist
Before export, check:
- Is the video in the correct order?
- Are there unwanted clips?
- Is the text readable?
- Is the audio clear?
- Are transitions smooth?
- Are effects appropriate?
- Is the video the correct length?
Previewing your work can prevent simple mistakes. KineMaster makes it easy to return to the timeline and make final changes.
Step 10: Export and Save Your Video
Once you finish editing, export the video. Choose suitable settings based on your platform and device.
KineMaster provides export options that can vary depending on the project, device, and available app features.
Choose Suitable Export Settings
Consider:
- Video resolution
- Frame rate
- File size
- Available storage
- Platform requirements
After selecting your settings, start the export process. KineMaster will process the project and create the final video file.
Beginner Tips for Better Video Editing
Learning video editing takes practice. Do not try to use every tool at once.
KineMaster becomes easier to use as you practice with different projects. Start with simple edits and slowly explore advanced features.
Useful Beginner Habits
Try these habits:
- Keep your first projects simple.
- Learn one tool at a time.
- Watch your video before exporting.
- Keep audio levels balanced.
- Use short clips when possible.
- Save your project regularly.
- Avoid unnecessary effects.
Practice is the best way to improve. As you become familiar with KineMaster, you can experiment with more advanced editing techniques.
Conclusion
Video editing does not have to be complicated. Beginners can create good videos by learning the basic steps and practicing regularly.
KineMaster provides tools for cutting clips, adding text, using transitions, editing audio, applying effects, changing speed, and exporting finished projects.
Start with a simple project and focus on clean editing. Learn each tool gradually instead of trying everything at once. With regular practice, KineMaster can help you turn basic clips into more polished and engaging videos.